Overall, queer was approved of by 72.9% of respondents, with 37.2% of respondents specifying queer was their preferred umbrella term.
Queer is the most widely preferred umbrella term, and the 3rd most approved of umbrella term, behind LGBT+ and LGBTQ+.
Groups that do not prefer the use of queer as an umbrella are: straight respondents, exclusionst-identifying respondents, transmedicalists, truscum, sex-negative respondents, and sex work critical respondents.
Queer as an umbrella was preferred above other umbrella terms by all gender identities, and by all orientation groups other than straight.
I’m fascinated to see that exclusionists are BY FAR the most opposed to the term “queer.” And that the only group that comes close to their 17% approval of the term is truscum, at 27%.
Not that I’m surprised they don’t like it. I’m surprised at the immense gap between what they insist, and scream, over and over – that very few people have reclaimed queer, that we should all avoid using it, that older people hate it because it was used against us but younger people hate it because only older people briefly reclaimed it –
and the reality of it being overwhelmingly accepted, preferred, and used, outside of all but a few very insulated groups.
What tickles me the most about it is that the one group where the majority does agree with exclusionists’ view of “gueer” is THE STRAIGHTS!
Like this makes me think so much of the whole “terfs and conservatives agree on a lot of stuff” -thing. (There’s a whole game somewhere, with quotes from terfs and conservatives where you have to guess which one said it, and it is a real fucking hard game…)
Like maybe you aren’t really all that much on the side you think you are, if you actually have a lot in common with the side that wants to hurt the group you claim to support.
We are officially done arguing about the appropriateness and appropriate usage of “queer.”
Everything movies taught me about archery is wrong. This is a complete mind-blower. 8D
If you are even remotely interested in archery or medieval combat, check this out, it’s just great!
OMFG EVERYONE PLEASE DROP WHAT YOU’RE DOING AND WATCH IT RIGHT NOW O_O
HOLY HELL
Not only is this fascinating, there are a lot of images from art history here. It just goes to show that what you can learn from the past isn’t limited to facts you can know, but things you can do.
Lars Andersen originally started using bow and arrow to fight in pretend battles during Larps (live action role play) events, where he played a soldier in a medieval-inspired army. While Larps can be about anything – the Danish/Polish Harry Potter inspired larp College of Wizardry (cowlarp.com) recently got world-wide media attention and there wasn’t a rubber sword in sight there – many Larps take place in fantasy worlds inspired by J.R.R. Tolkien’s The Lord of the Rings. And it was at one of these Larps, that Lars started to learn to shoot fast while moving.
In 2012, Lars Andersen released his video, “Reinventing the fastest forgotten archery”, where he showed how he had learned to shoot from old archery manuscripts. Using these old, forgotten techniques, Lars demonstrated how he was now the fastest archer on the planet, and after its release, the video got 3 million hits on YouTube in two days.
Since the 2012 video was released, Lars has studied and practiced, and he is now able to fire three arrows in 0.6 seconds – a truly stunning feat making him much faster than the legendary fictional archer Legolas (played by Orlando Bloom in the Lord of the Rings movies).
The time benchmark he was trying to achieve, according to the video, was the expectation of the speed at which “Saracen” archers were expected to shoot. In fact, most of the source material as far as I can see isn’t European.
A lot of the techniques described are also used in Mongolian Archery, which requires being able to shoot from horseback, and is traditionally practiced by men and women. You can see a video here.
this isn’t a horse this is a fucking mystical spirit ready to lead you on a YA fantasy novel adventure i mean goddamn
My first two thoughts were -this is how that fucker looks at you before he bolts off into the woods without a halter on going “HA HA”
And
-man I feel sorry for whoever has to groom that tail after this photo shoot.
This photo is blowing my mind. Is this a Photoshop job? Appies don’t usually have long flowing manes and tails like that, nor do they normally look so slender and refined. It’s almost like a Saddlebred with Appy markings.
Most likely it’s an Appaloosa sport horse, Walkaloosa, or Arappaloosa. Appaloosa sport horses can be bred from all kinds of stock. There’s also plenty of crossbred Saddlebreds (and National Show Horses, and Arabs, and Thoroughbreds, etc) with Appaloosas for people that want a gaited horse with flash and spots.
And while it does have a -long- mane and tail— which can be achieved simply by bagging the tail up and -never- touching it with a brush so you don’t pull hairs out willy-nilly, OR with tail extensions— it doesn’t look like a particularly full and luxurious mane and tail. It’s kinda lanky, which is pretty indicative of the horse’s appaloosa heritage.
I’ve been using Clip Studio Paint (aka Manga Studio 5) for the last 2 years and I really cannot recommend it enough. It has the smoothness and blending of SAI, a really good brush system and some of Photoshop’s capabilities without the heaviness of the software. I mean, what more could you want?
Unfortunately I feel like the UI deters some people from using it (including my friends…). I can see why and I have to admit the default layout looks a little overwhelming in the beginning. On the bright side, CSP is incredibly flexible with its settings and there are many ways to adapt it to suit what you’re accustomed to. In my case, I wanted something more similar to SAI to make the software transition smoother (old habits die hard I guess).
* There’s a note at the end of this post with a download link to my layout and hotkey settings, plus instructions on how to enable it.
I hope this helps people who feel somewhat lost when they open the program for the first time ><
First things first: Close everything you don’t want and drag panels around. Re-arrange everything however you want, even down to tool order. Actually, most of this post may come off as common sense, but I think it still helps to have a rough idea of what exactly you can do with CSP if you find yourself just not getting into it at all.
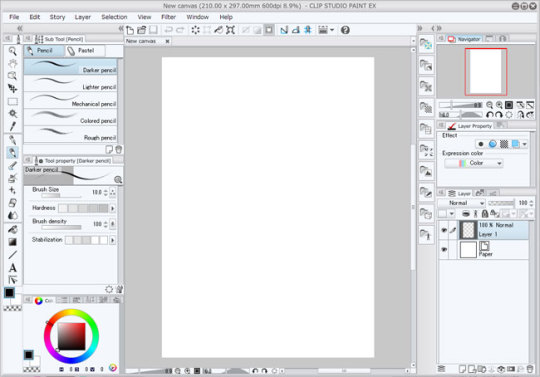
This is the default:
My current layout:
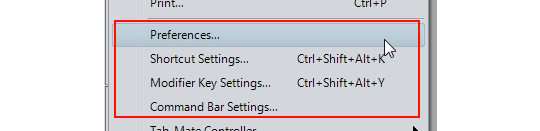
After that, there are four areas of settings you need to check on, under File:
Preferences
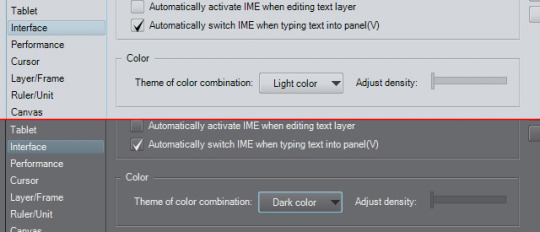
From the Preferences you can edit a lot of options regarding to how the software functions. From a UI and general ease-of-use standpoint, these are the key points you might want to look at: ►Interfacetab: You can change the UI to have a light or dark colour using a slider, from a really light gray to really dark gray (almost black, similar to Photoshop CS6 default)
► Cursor tab: You can change what the cursor looks like when selecting certain tools. ► Layer/Frame tab: You can change the naming convention for when you duplicate a layer, and you can also set layer folders to [Through] layer mode as a default, instead of [Normal] layer mode. ► Ruler/Unit tab: For changing the guide lines for when you set rulers, also setting the default units you want to use (px or mm) ► Canvastab: Under ‘Scale’ and ‘Angle’ you can set the zoom and rotate levels the zoom and rotate buttons snap to.
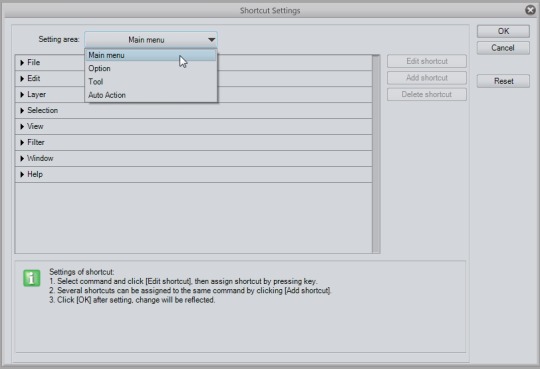
Shortcut Settings
This is pretty self-explanatory and if you’ve modified Photoshop hotkeys, the window might look familiar. If you use hotkeys heavily like me, I recommend you look through it thorougly since some hotkeys might be different from what you’re used to or don’t have a hotkey set to it at all. You can set hotkeys to anything on the main menu, various general options (like increasing/decreasing brush size and main>sub colour switching), specific tools (even custom brushes) and auto actions. Settings I recommend checking, mostly because these are what I personally care about:
Main Menu: Edit > Clear Edit > Fill Edit > Convert brightness to opacity (converts degrees of white to degrees of transparency, useful for things like lineart) Edit > Transform Layer > Duplicate layer Layer > Merge with layer below / Combine selected layer (these two are different, and unlike in PS where Ctrl+E works for both, it is separate for CSP) Layer > Combine copies of displayed layer (Merges all visible layers into a separate layer, aka PS’s monster shortcut of Ctrl+Alt+Shift+E) Selection > Select All Selection > Deselect Selection > Invert selected area View > Rotate > Flip Horizontal (mirroring)
Option: Drawing color > Switch main color and sub color Drawing color > Switch to transparent color … Or any of the different combinations they have, depending on what you want. Unlike PS and SAI, CSP has a third colour option available, which is ‘transparent’, so you can ‘paint’ using transparency, which functions pretty much like the eraser without needing to change tools.
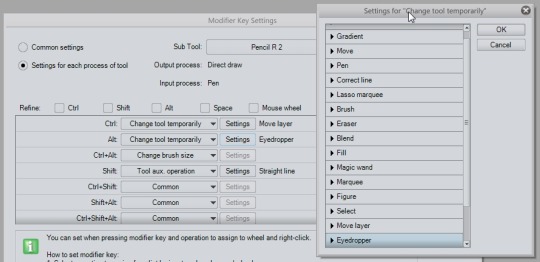
Modifier Key Settings
This is a pretty important part to stop by because it affects how you use your tools. Basically, for each tool, you can set what happens when you hold Ctrl, Shift, Alt, Spacebar or use the mouse wheel. With Photoshop and SAI, you may be used to normally having the colour picker / eyedropper when you hold Alt, and moving the layer’s contents when you hold Ctrl. Some of CSP’s default values of these shortcut keys are different, and I recommend getting a feel for the tools you use and changing these settings as you go.
To change a brush to eyedropper while holding Alt: ► Select ‘Settings for each process of tool’, and under ‘Sub Tool’ select which specific tool you want. ► Under the ‘Alt’ dropdown, select ‘Change tool temporarily’, then click the Settings button. Select ‘Eyedropper’ and click OK. (You don’t have to go all the way down the list of settings, unless you want to refine it to a more specific function)
To change to move layer while holding Ctrl: ► Do the same except under ‘Ctrl’, select ’ Change tool temporarily’ to ‘Move layer’.
Other settings from the drop down: ► For Shift, you can go to ‘Tool aux. operation’ on the dropdown, and check the ‘Straight line’ box to make straight lines that connect clicks when you hold Shift.
There are more so please look at the list carefully if you find yourself needing something regarding those key holds.
Command Bar Settings
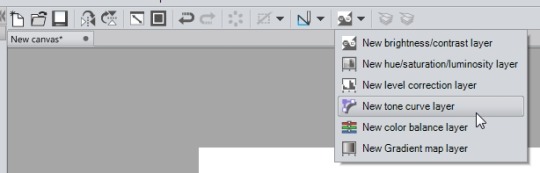
The command bar is the strip at the top with all the icons, just above the canvas tab. Basically you can put a bunch of shortcuts there of anything in the main menu. It’s really up to you. For mine, I keep the View > Rotate > Flip Horizontal icon on there so I can tell if my canvas is mirrored (because sometimes I forget the canvas is flipped and only realise when I’ve saved and looked at the pic). I also put the icons of all the correction layers I use the most, and the Layer > Combine selected layers icon since my Ctrl+E is already taken up by Merge with layer below.
Additional general notes on navigating and setting up CSP:
► I recommend checking out everything under the Window menu, you might find a really handy panel that isn’t normally open, or you can even disable the Command Bar if you want. I like to keep the Information tab somewhere on the side so I can see if I’ll start lagging any time soon because of big files (lol).
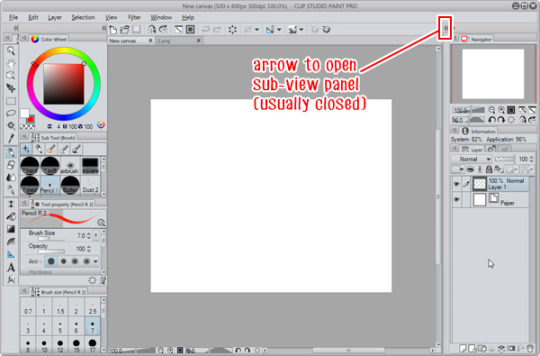
► The Sub View panel is also really useful that it works as a box to place reference images in. You can open an entire folder there and scroll through using the arrows. You can set it so that every time you hover over the panel, the eyedropper is automatically on (handy!)
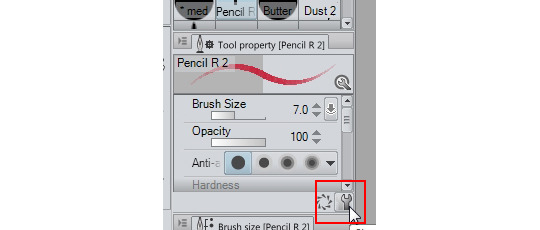
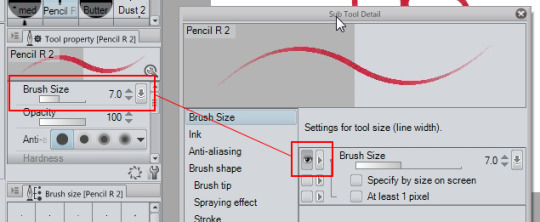
► Brush settings are accessible through this little wrench here at the bottom right corner of the tool property panel.
► Speaking of brushes, you can select which options are visible in the tool property panel by enabling the eye button.
► Each panel has this menu button. You’ll find even more display options there such as enabling/disabling panel-specific icon bars, changing the size of brush tiles, etc.
____________________________
TL;DR: Anyways, if you are too lazy to do this all yourself, you can just download my workspace file and open it yourself. Everything I’ve written about here (shortcuts, modifier keys, etc.) I’ve set to suit habits I’ve formed from using PS and SAI over the years. If you are in the same situation then I hope this will come in handy as a base for your own settings!
Personal hotkey list that’s included in the file (that I can remember): A = Brightness to opacity D = Clear layer F = Fill Ctrl+J = Duplicate Layer Ctrl+K = Flip layer/selection horizontally (as in the Transform command, and not mirror) Ctrl+U = Hue/Saturation Ctrl+L = Levels Ctrl+Shift+I = Invert selection Ctrl+I = Invert colours Ctrl+E = Merge to layer below Ctrl+Alt+Shift+E = Merge all visible layers to a separate layer Ctrl+T = Transform Z = Main > Sub colour switch Shift+Z = Switch to transparent colour X = Mirror canvas 1,2,3,4,5,6,7,8,9,0 = Change brush opacity in 10% increments End = Resets Rotate and Mirror
Things like Ctrl+Z / X / C / V / A / D / W / O / S etc. remain the same as normal in other programs. Ctrl+Y is Redo.
Instructions: Put the file in your Documents CELSYS_EN CLIPStudioPaintVer1_1_0 Workspace Folder. Then open CSP and go to Window > Workspace and select “SAI…ish”. Click OK to importing the settings. Hopefully that should work! (If nothing changes, you can try Workspace > Reset “SAI…ish” and click Yes)
* Make sure the file is named workspace_2.spws * If that clashes with another workspace in your files, you can just change the 2 to any number